In this step, you will learn how to create a layout template and how to build an application that has multiple views by adding routing, using an AngularJS module called ngRoute.
- When you now navigate to
/index.html, you are redirected to/index.html#!/phonesand the phone list appears in the browser. - When you click on a phone link, the URL changes to that specific phone and the stub of a phone detail page is displayed.
Reset the workspace to step 9.
git checkout -f step-9
Refresh your browser or check out this step online: Step 9 Live Demo.
The most important changes are listed below. You can see the full diff on GitHub.
Dependencies
The routing functionality added in this step is provided by AngularJS in the ngRoute module, which
is distributed separately from the core AngularJS framework.
Since we are using npm to install client-side dependencies, this step updates the
package.json configuration file to include the new dependency:
package.json:
{
  "name": "angular-phonecat",
  ...
  "dependencies": {
    "angular": "1.8.x",
    "angular-route": "1.8.x",
    "bootstrap": "3.3.x"
  },
  ...
}
The new dependency "angular-route": "1.8.x" tells npm to install a version of the angular-route
module that is compatible with version 1.8.x of AngularJS. We must tell npm to download and install
this dependency.
npm installMultiple Views, Routing and Layout Templates
Our app is slowly growing and becoming more complex. Prior to this step, the app provided our users
with a single view (including the list of all phones), and all of the template code was located in
the phone-list.template.html file. The next step in building the application is to add a view that
will show detailed information about each of the devices in our list.
To add the detailed view, we are going to turn index.html into what we call a "layout template".
This is a template that is common for all views in our application. Other "partial templates" are
then included into this layout template depending on the current "route" — the view that is
currently displayed to the user.
Application routes in AngularJS are declared via the $routeProvider, which is the provider of the $route service. This service makes it easy to wire together controllers, view templates, and the current URL location in the browser. Using this feature, we can implement deep linking, which lets us utilize the browser's history (back and forward navigation) and bookmarks.
ngRoute lets us associate a controller and a template with a specific URL (or URL
pattern). This is pretty close to what we did with ngController and index.html back in
step 2.
Since we have already learned that components allow us to combine controllers with templates in a modular, testable way, we are going to use components for routing as well. Each route will be associated with a component and that component will be in charge of providing the view template and the controller.
A Note about DI, Injector and Providers
As you noticed, dependency injection (DI) is at the core of AngularJS, so it's important for you to understand a thing or two about how it works.
When the application bootstraps, AngularJS creates an injector that will be used to find and inject
all of the services that are required by your application. The injector itself doesn't know anything
about what the $http or $route services do. In fact, the injector doesn't even know about the
existence of these services, unless it is configured with proper module definitions.
The injector only carries out the following steps:
- Load the module definition(s) that you specify in your application.
- Register all Providers defined in these module definition(s).
- When asked to do so, lazily instantiate services and their dependencies, via their Providers, as parameters to an injectable function.
Providers are objects that provide (create) instances of services and expose configuration APIs,
that can be used to control the creation and runtime behavior of a service. In case of the $route
service, the $routeProvider exposes APIs that allow you to define routes for your application.
config functions. Thus you could not inject
$routeProvider into PhoneListController at runtime.
AngularJS modules solve the problem of removing global variables from the application and provide a way of configuring the injector. As opposed to AMD or require.js modules, AngularJS modules don't try to solve the problem of script load ordering or lazy script fetching. These goals are totally independent and both module systems can live side-by-side and fulfill their goals.
To deepen your understanding on AngularJS's DI, see Understanding Dependency Injection.
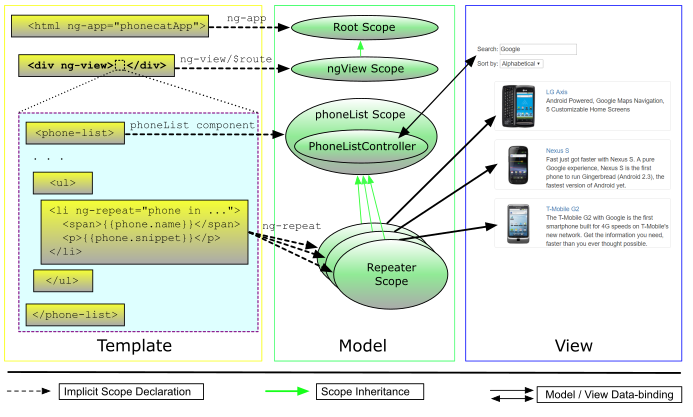
Template
The $route service is usually used in conjunction with the ngView
directive. The role of the ngView directive is to include the view template for the current route
into the layout template. This makes it a perfect fit for our index.html template.
app/index.html:
<head>
  ...
  <script src="lib/angular/angular.js"></script>
  <script src="lib/angular-route/angular-route.js"></script>
  <script src="app.module.js"></script>
  <script src="app.config.js"></script>
  ...
  <script src="phone-detail/phone-detail.module.js"></script>
  <script src="phone-detail/phone-detail.component.js"></script>
</head>
<body>

  <div ng-view></div>

</body>
We have added four new <script> tags in our index.html file to load some extra JavaScript files
into our application:
angular-route.js: Defines the AngularJSngRoutemodule, which provides us with routing.app.config.js: Configures the providers available to our main module (see below).phone-detail.module.js: Defines a new module containing aphoneDetailcomponent.phone-detail.component.js: Defines a dummyphoneDetailcomponent (see below).
Note that we removed the <phone-list></phone-list> line from the index.html template and
replaced it with a <div> with the ng-view attribute.
Configuring a Module
A module's .config() method gives us access to the available
providers for configuration. To make the providers, services and directives defined in ngRoute
available to our application, we need to add ngRoute as a dependency of our phonecatApp module.
app/app.module.js:
angular.module('phonecatApp', [
  'ngRoute',
  ...
]);
Now, in addition to the core services and directives, we can also configure the $route service
(using its provider) for our application. In order to be able to quickly locate the configuration
code, we put it into a separate file and used the .config suffix.
app/app.config.js:
angular.
  module('phonecatApp').
  config(['$routeProvider',
    function config($routeProvider) {
      $routeProvider.
        when('/phones', {
          template: '<phone-list></phone-list>'
        }).
        when('/phones/:phoneId', {
          template: '<phone-detail></phone-detail>'
        }).
        otherwise('/phones');
    }
  ]);
Using the .config() method, we request the necessary providers (for example the $routeProvider)
to be injected into our configuration function and then use their methods to specify the behavior of
the corresponding services. Here, we use the
$routeProvider.when() and
$routeProvider.otherwise() methods to define our
application routes.
Our routes are defined as follows:
when('/phones'): Determines the view that will be shown, when the URL hash fragment is/phones. According to the specified template, AngularJS will create an instance of thephoneListcomponent to manage the view. Note that this is the same markup that we used to have in theindex.htmlfile.when('/phones/:phoneId'): Determines the view that will be shown, when the URL hash fragment matches/phones/<phoneId>, where<phoneId>is a variable part of the URL. In charge of the view will be thephoneDetailcomponent.otherwise('/phones'): Defines a fallback route to redirect to, when no route definition matches the current URL.(Here it will redirect to/phones.)
We reused the phoneList component that we have already built and a new "dummy" phoneDetail
component. For now, the phoneDetail component will just display the selected phone's ID.
(Not too impressive, but we will enhance it in the next step.)
Note the use of the :phoneId parameter in the second route declaration. The $route service uses
the route declaration — '/phones/:phoneId' — as a template that is matched against the current
URL. All variables defined with the : prefix are extracted into the (injectable)
$routeParams object.
You may have noticed, that — while the configured route paths start with / (e.g.
/phones) — the URLs used in templates start with #!/ (e.g. #!/phones).
Without getting into much detail, AngularJS (by default) uses the hash part of the URL (i.e.
what comes after the hash (#) symbol) to determine the current route. In addition to that, you
can also specify a hash-prefix (! by default) that needs
to appear after the hash symbol in order for AngularJS to consider the value an "AngularJS path"
and process it (for example, try to match it to a route).
You can find out more about how all this works in the Using $location section
of the Developer Guide. But all you need to know for now, is that the URLs to our various routes
should be prefixed with #!.
The phoneDetail Component
We created a phoneDetail component to handle the phone details view. We followed the same
conventions as with phoneList, using a separate directory and creating a phoneDetail module,
which we added as a dependency of the phonecatApp module.
app/phone-detail/phone-detail.module.js:
angular.module('phoneDetail', [
  'ngRoute'
]);
app/phone-detail/phone-detail.component.js:
angular.
  module('phoneDetail').
  component('phoneDetail', {
    template: 'TBD: Detail view for <span>{{$ctrl.phoneId}}</span>',
    controller: ['$routeParams',
      function PhoneDetailController($routeParams) {
        this.phoneId = $routeParams.phoneId;
      }
    ]
  });
app/app.module.js:
angular.module('phonecatApp', [
  ...
  'phoneDetail',
  ...
]);
A Note on Sub-module Dependencies
The phoneDetail module depends on the ngRoute module for providing the $routeParams object,
which is used in the phoneDetail component's controller. Since ngRoute is also a dependency of
the main phonecatApp module, its services and directives are already available everywhere in the
application (including the phoneDetail component).
This means that our application would continue to work even if we didn't include ngRoute in the
list of dependencies for the phoneDetail component. Although it might be tempting to omit
dependencies of a sub-module that are already imported by the main module, it breaks our hard-earned
modularity.
phoneDetail feature over to another project
that does not declare a dependency on ngRoute. The injector would not be able to provide
$routeParams and our application would break.
The takeaway here is:
- Always be explicit about the dependencies of a sub-module. Do not rely on dependencies inherited from a parent module (because that parent module might not be there some day).
Testing
Since some of our modules depend on ngRoute now, it is necessary to update the Karma configuration file with angular-route. Other than that, the unit tests should (still) pass without any modification.
karma.conf.js:
files: [
  'lib/angular/angular.js',
  'lib/angular-route/angular-route.js',
  ...
],
To automatically verify that everything is wired properly, we wrote E2E tests for navigating to
various URLs and verifying that the correct view was rendered.
e2e-tests/scenarios.js
...

it('should redirect `index.html` to `index.html#!/phones', function() {
  browser.get('index.html');
  expect(browser.getCurrentUrl()).toContain('index.html#!/phones');
});

...

describe('View: Phone list', function() {

  beforeEach(function() {
    browser.get('index.html#!/phones');
  });

  ...

});

...

describe('View: Phone details', function() {

  beforeEach(function() {
    browser.get('index.html#!/phones/nexus-s');
  });

  it('should display placeholder page with `phoneId`', function() {
    expect(element(by.binding('$ctrl.phoneId')).getText()).toBe('nexus-s');
  });

});

...
You can now rerun npm run protractor to see the tests run (and hopefully pass).
Experiments
Try to add a
{{$ctrl.phoneId}}binding in the template string for the phone details view:when('/phones/:phoneId', { template: '{{$ctrl.phoneId}} <phone-detail></phone-detail>' ...You will see that nothing happens, even when you are in the phone details view. This is because the
phoneIdmodel is visible only in the context set by thephoneDetailcomponent. Again, component isolation at work!
Summary
With the routing set up and the phone list view implemented, we are ready to go to step 10 and implement a proper phone details view.